Osstell Beacon
Osseointegration? Easy.
The Osstell Beacon helps you to objectively determine implant stability and to assess the progress of osseointegration – without jeopardizing the healing process. The Osstell Beacon uses proprietary and evidence-based RFA technology, based on thousands of scientific studies. It also includes OsstellConnect, a free cloud-based platform that provides access to extensive implant data and supports improved patient communication.
Predictable outcomes: Confidence in every implant treatment
Our method removes guesswork. By measuring implant stability with an objective value, Osstell makes implant treatments more predictable and reliable for every patient.
Optimal treatment time: Tailored to each unique patient
Immediate loading is becoming more and more common. Patients want results fast. With Osstell®, you only wait as long as needed.
Evidence-based: Backed by more than 1500 scientific studies
Backed by more than 1500 scientific studies, our method is based on RFA to determine whether or not an implant is stable enough. The result is presented as an ISQ value of 1-99. The higher the ISQ, the more stable the implant.
OsstellConnect & Osstell Beacon
Enhance your implant treatments
OsstellConnect is a free cloud-based solution offering a new way for clinicians to use data to enhance their dental implant treatments. It is one of the world’s largest implant online portal with more than a quarter of a million datapoints. OsstellConnect is currently free of charge and accessible to Osstell Beacon and Osstell IDx.
Learn more about OsstellConnectImplantmed Plus II & Osstell Beacon
Precision and reliability with W&H’s Implantmed Plus II and Osstell Beacon
W&H’s Implantmed Plus II, combined with the Osstell Beacon, offers an ideal solution for safe and precise implant procedures. With features like automatic torque control for secure implant insertion and a thread cutter function for improved precision, Implantmed Plus II ensures ease and accuracy. The Osstell Beacon further enhances this experience by displaying real-time ISQ stability measurements directly on screen, simplifying documentation and supporting optimal patient outcomes. Explore the Implantmed Pluis II+ Osstell Beacon package to bring greater precision to your practice.
Learn more about W&H’s solutionsVideos
Setup
In this short video we will guide you, step-by-step, how to set up and register your Osstell Beacon in OsstellConnect. Get started in 5 minutes and get 2 boxes of SmartPegs for free.
Register
Measure implant stability with Osstell Beacon
The Osstell Beacon determines implant stability in a matter of seconds. In this video, we show you how to measure. For more step-by-step guides, please visit the Help section in your OsstellConnect account.
OsstellConnect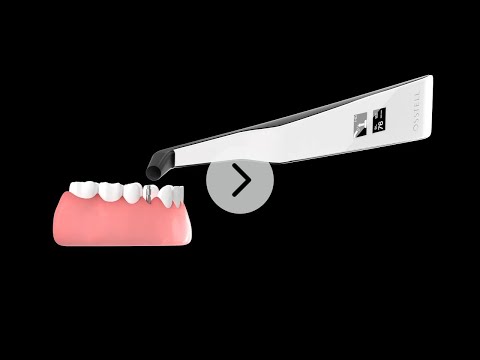
Search for distributor
Albania
1 distributorAlgeria
1 distributorArgentina
2 distributorsJuan Novacek S.A. Productos dentales
Marcelo T. de Alvear 2129/31
C1122AAG Buenos Aires
Contact: Carlos Bugliolo
Armenia
2 distributorsIMPLANTMED LLC
58/36 M.Baghramyan ave.
0019 Yerevan
Contact: Varduhi Hovhannisyan
Phone: +374 96 020131
W&H Representative Office Moscow
ul. Barclay 6, Stroenie 5, Business Center “Barclay Plasa”, et. 6, of. 628
121087 Moscow Russia
Contact: Irina Kiseleva
Phone: +7 967 0949575
Australia
1 distributorW&H Australasia Pty Ltd
10 Konando Terrace
SA 5039 Edwardstown
Contact: Gary Williams
Phone: 1300613988
Fax: 61438201950
Austria
1 distributorW&H Austria GmbH
Ignaz-Glaser-Straße 53
5111 Bürmoos Österreich
Phone: 4362746236890
Fax: 4362746236239
Azerbaijan
2 distributorsW&H Representative Office Moscow
ul. Barclay 6, Stroenie 5, Business Center “Barclay Plasa”, et. 6, of. 628
121087 Moscow Russia
Contact: Irina Kiseleva
Phone: +7 967 0949575
Bahrain
2 distributorsGULF PHARMACIES
Bldg 2038, Road 4156, Block 341
Manama
Contact: Ayisha Yasmin
Phone: +973 17 239 386
Bangladesh
1 distributorW&H Dental India PVT Ltd
No: 326, 3rd Floor, 3rd A cross, A sector 1st Phase
Yelahanka Satellite Town, Bangalore – 64
Contact: Radhakrishnan Raghavan
Phone: 919886025778
Belarus
1 distributorW&H Representative Office Moscow
ul. Barclay 6, Stroenie 5, Business Center “Barclay Plasa”, et. 6, of. 628
121087 Moscow Russia
Contact: Irina Kiseleva
Phone: +7 967 0949575
Belgium
13 distributorsBosnia
1 distributorBrazil
1 distributorIMPLACIL DE BORTOLI – MATERIAL ODONTOLÓGICO S.A.
Cesario Ramalho Street, 821 – Cambuci
Sao Paulo-SP, 01521-000
Contact: Aluizio Canto
Phone: +55 11 99496-6313
Fax: +55 11 3342-5100
Bulgaria
1 distributorCambodia
2 distributorsUnident Co., Ltd
Rose Garden, Block 252, Shop No. 11, Preah Norodom Blvd,Sangkat Tonle Bassac
120101 Phnom Penh, Khan Chamkarmorn
Contact: Sreya
Phone: +855 23 950 338
Canada
9 distributorsStraumann Canada Ltd.
3375 North Service Rd, Units B12-14
L7N 3G2 Burlington, Ontario
Phone: 800 363 4024
Fax: 800 524 6752
Precision Dental
#20 – 100 Kal Lake Road
V1T 9G1 Vermon, British Columbia
Phone: 866 729 9229
Fax: 778 475 6123
H&H Company
11888 N Tracey Rd
83835 Hayden, ID
Contact: 800-491-9989
Phone: 208-719-0861
Fax: 208-719-0864
Chile
2 distributorsDental Laval
Miraflores 383 oficina 2504
Santiago 8320000
Contact: Victor Venegas
Phone: 56228968110
China
1 distributorColombia
2 distributorsRepresentaciones Eurodent S.A.S
Calle 127 No. 7-70
Bogotá D.C.
Contact: Johana Lara
Phone: 5716054000
Costa Rica
2 distributorsImplantec S.A.
Los Yoses, de Autos Subar 200 mts Sur
666-1000 San José, Costa Rica
Croatia
2 distributorsCyprus
2 distributorsCzech Republic
7 distributorsHASPA dent, spol s.r.o
Olomoucká 704/174
627 00 Brno
Contact: Lukáš Urbánek
Phone: +420 77 44 11 809
Denta Servis s.r.o
Rudolfovska tr. 476/111
37001 Ceske Budejovice
Contact: Michaela Homolkova
Phone: +420 777 102 488
Denmark
1 distributorEgypt
2 distributorsIMECO
4,Mohamed Moussa St.Azarita
21131 Alexandria
Contact: Dr. Ahmed Bastawissi
Phone: +201007211956
W&H
Estonia
2 distributorsFinland
1 distributorFrance
1 distributorGeorgia
3 distributorsW&H Representative Office Moscow
ul. Barclay 6, Stroenie 5, Business Center “Barclay Plasa”, et. 6, of. 628
121087 Moscow Russia
Contact: Irina Kiseleva
Phone: +7 967 0949575
Germany
1 distributorGreece
3 distributorsOral Vision IKE
13, Mayer str.
10438 Athens
Contact: Attn. Pavlos Peristerakis
Phone: 302107755900
Fax: 302107755009
Hong Kong
1 distributorTesco Dental HK Ltd
Unit D-F, 15/F, The Globe, 79 Wing Hong Street, Lai Chi Kok, Kowloon
999077 Hong Kong
Phone: 85239790314
Hungary
3 distributorsIndia
1 distributorW&H Dental India PVT Ltd.
No: 388, 407 SFS, 1st Main Road, 4th Phase
Yelahanka New Town, Bangalore – 560064
Phone: 918048522450
Indonesia
2 distributorsIraq
2 distributorsIreland
2 distributorsW&H UK
6, Stroud Wood Business Centre, Park Street St Albans
Hertfordshire AL2 2NJ
Phone: 4401727874990
Fax: 4401727874628
Mac Technologies
Garden Studio 17 St Thomas Road, Newquay Cornwall
TR7 1RS United Kingdom
Phone: 4401637871479
Israel
2 distributorsHirsch & Son Dental Equipment Ltd
5, Tel Giborim Street (Tefer House)
Tel-Aviv 68150
Phone: 97236830683
Italy
1 distributorJapan(日本)
2 distributorsJ. Morita Corporation
Import Merch.Group 3-33-18 Tarumi-cho Suita City(吹田市垂水町3丁目33番18号)
5648650 Osaka Japan(〒564-8650 日本国、大阪府)
Jordan
1 distributorKosovo
2 distributorsKuwait
2 distributorsKyrgyzstan
1 distributorW&H Representative Office Moscow
ul. Barclay 6, Stroenie 5, Business Center “Barclay Plasa”, et. 6, of. 628
121087 Moscow Russia
Contact: Irina Kiseleva
Phone: +7 967 0949575
Latvia
2 distributorsLebanon
1 distributorLithuania
2 distributorsLuxembourg
1 distributorMalaysia
2 distributorsSOCIUS (M) SDN BHD
16 JALAN SUNGAI BURUNG W32/W
BUKIT RIMAU
40460 SHAH ALAM, Selangor
Phone: 0351213166
Malta
2 distributorsMexico
3 distributorsMoldova
2 distributorsMongolia
1 distributorMontenegro
1 distributorMyanmar
2 distributorsSilver Lotus Co., Ltd.
No. 204, Bo Myat Htun Street, Pazundaung Township
Yangon, Myanmar
Contact: Dr. Sunn Wynn
Netherlands
10 distributorsNew Zealand
1 distributorIvoclar Vivadent NZ
12 Omega Street, Rosedale, Auckland, 0632
PO Box 303011, North Harbour. 0751
Contact: Gary Robinson
Phone: 6499149999
Fax: 021745059
North Macedonia
1 distributorNorway
1 distributorOman
1 distributorPalestine
1 distributorPanama
1 distributorParaguay
1 distributorPeru
1 distributorPhilippines
2 distributorsPoland
1 distributorPortugal
1 distributorQatar
2 distributorsRomania
2 distributorsRussia
1 distributorW&H Representative Office Moscow
ul. Barclay 6, Stroenie 5, Business Center “Barclay Plasa”, et. 6, of. 628
121087 Moscow Russia
Contact: Irina Kiseleva
Phone: +7 967 0949575
Saudi Arabia
1 distributorSerbia
1 distributorSingapore
2 distributorsHealthbiz Resource Pte Ltd
Blk 5, Ang Mo Kio Industrial Pk 2A
Ang Mo Kio Tech II # 05-21
567760 Ang Mo Kio
Singapore
Phone: 654811610
Slovakia
2 distributorsSlovenia
2 distributorsSouth Africa
1 distributorStraumann Group SA (Pty) Ltd
15 Huising Street Somerset West
7130 Western Cape South Africa
Phone: 27218500823
Fax: 27824931999
South Korea
1 distributorOsstem Co. Ltd.
B Dong 6F, 3, Magokjungang 12-ro, Gangseo-gu
07789 Seoul, South Korea
Phone: 82 70 7016 4257
Spain
1 distributorSri Lanka
1 distributorW&H Dental India PVT Ltd.
No: 326, 3rd Floor, 3rd A cross, A sector 1st Phase
Yelahanka Satellite Town, Bangalore – 64
Contact: Radhakrishnan Raghavan
Phone: 919886025778
Sweden
1 distributorSwitzerland
1 distributorSyria
1 distributorTaiwan
2 distributorsTesco Dental Asia Ltd. Taiwan Branch
Phone: 886227185069
Tajikistan
1 distributorW&H Representative Office Moscow
ul. Barclay 6, Stroenie 5, Business Center “Barclay Plasa”, et. 6, of. 628
121087 Moscow Russia
Contact: Irina Kiseleva
Phone: +7 967 0949575
Thailand
2 distributorsDS ALL Co., Ltd.
615 Jituthai Buildning 11th Floor
Ramkhamhaeng RD. HUA-MARK
10240 Bankgkapi, Bankgkok
Phone: 6623751516
Turkey
1 distributorW&H Dental Ticaret Sirketi Limited
W&H Dental Ticaret Sirketi Limited Kısıklı Mh. Alemdağ Cd. No:60 C Blok D:6 Masaldan iş Merkezi
34692 Çamlica Üsküdar / Istanbul
Phone: 902165058840
Fax: 902165058843
Turkmenistan
1 distributorW&H Representative Office Moscow
ul. Barclay 6, Stroenie 5, Business Center “Barclay Plasa”, et. 6, of. 628
121087 Moscow Russia
Contact: Irina Kiseleva
Phone: +7 967 0949575
Ukraine
1 distributorUnited Arab Emirates
2 distributorsPrime Medical Supplies Est.
ADCP Bdg. Tower C. Floor 21/2103
Electra Street, P.O.Box 44633
Abu Dhabi, United Arab Emirates
Phone: 97126666037
United Kingdom
2 distributorsW&H UK
6, Stroud Wood Business Centre, Park Street St Albans
Hertfordshire AL2 2NJ
Phone: 4401727874990
Fax: 4401727874628
Mac Technologies
Garden Studio 17 St Thomas Road, Newquay Cornwall
TR7 1RS United Kingdom
Phone: 4401637871479
United States
12 distributorsACE Southern
1034 Pearl Street,
02301 Brockton, Massachusetts
Contact: 800 441 3100
Phone: 508 588 3100
Fax: 800 583 3150
Global Dental Shop
1426 21st., NW, Second Floor,
20036 Washington, District of Columbia
Phone: 202 331 3061
Fax: 202 331 3475
H&H Company
11888 N Tracey Rd
83835 Hayden, ID
Contact: 800-491-9989
Phone: 208-719-0861
Fax: 208-719-0864
Keystone Dental Inc.
144 Middlesex Turnpike
01803 Burlington, Massachusetts
Phone: 781 328 3300
Fax: 866 903 9272
Straumann LLC
60 Minuteman Road
01810 Andover, Massachusetts
Contact: 800 448 8168
Phone: 978 747 2500
Fax: 978 747 2490
Uzbekistan
1 distributorW&H Representative Office Moscow
ul. Barclay 6, Stroenie 5, Business Center “Barclay Plasa”, et. 6, of. 628
121087 Moscow Russia
Contact: Irina Kiseleva
Phone: +7 967 0949575
Vietnam
2 distributorsN.K. Luck Co. Ltd
781/A13 Le Hong Phong noi dai Street
Ward 12, District 10
Ho Chi Minh City
Phone: 008488620090
Frequently asked questions
Got a question regarding Osstell Beacon? Our FAQ is the fastest way to get help. Below you will find the most frequently asked questions regarding Osstell Beacon. If you can’t find the answer you are looking for, don’t hesitate to contact us.
Charge the Beacon for at least 30 min in room temperature, then try again. If the error remains, try resetting the device by:
1. Identify the Beacon reset pin on the picture below.
![]()
2. With a paper clip, do a gentle press for 1 second on the reset button (Note! You may have to tilt the pin a little downwards).
If you see a “PadLock” symbol in the upper display, press one more time on the reset button.
If the Beacon still doesn’t start or the display is showing a wrench and a manual, then please contact your local sales representative or distributor or support@osstell.com.
You may also be interested in
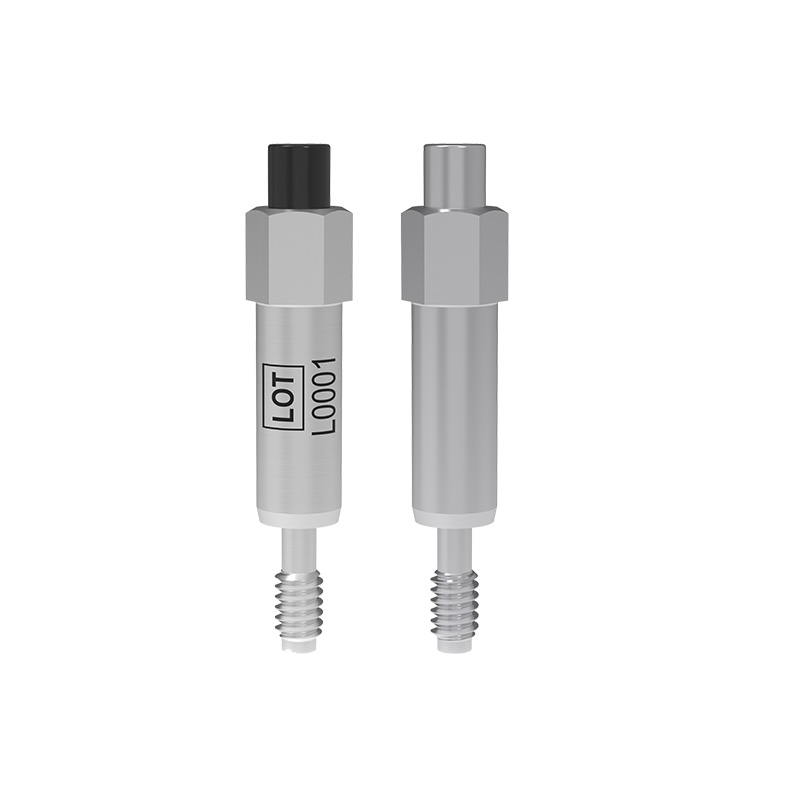
SmartPeg
The SmartPeg™ attaches to the implant and is used together with the measurement instruments Osstell Beacon, Osstell IDx or Osstell ISQ.
OsstellConnect
OsstellConnect is a free cloud-based solution offering a new way for clinicians to use data to enhance their dental implant treatments.