Measuring dental implant stability at the abutment level
May 06, 2025
Introduction
Dental implant stability is a critical factor in ensuring the success and longevity of implants. Measuring stability at the abutment level can provide valuable insights into the healing process and help achieve predictable outcomes. Additionally, it allows for dental implant stability measurements even after the final restoration is placed. If the restoration is removed during a treatment session, a measurement can be conducted from the abutment level to ensure stability remains consistent over time. This article will guide you through the process of measuring implant stability at the abutment level, highlighting the importance of accurate measurements and the steps involved.
Why measure implant stability at the abutment level?
Measuring implant stability at the abutment level can offer several advantages:
- Enhanced predictability: Depending on the surgical protocol and implant system, the abutment may be installed before or at the time of loading. Measuring stability at the abutment level helps clinicians make informed decisions.
- Monitoring healing: Abutment level measurements, as well as implant level measurements, can help monitoring the osseointegration process and detect any potential issues early on.
- Consistency and post-restoration measurements: Establishing a consistent measurement protocol ensures reliable data over time. Measuring stability at the abutment level allows for assessments even after the final restoration is placed. If the restoration is removed during a treatment session, a measurement can be conducted to ensure stability remains consistent.
Procedure for accurate ISQ measurement at the abutment level
To obtain a true Implant Stability Quotient (ISQ) measurement at the abutment level, follow these steps:
- 1. Initial implant level measurement: Perform an implant level measurement before installing the abutment. This provides a baseline ISQ value.
- 2. Abutment level measurement: During the same session, perform an abutment level measurement. There will typically be a difference between the two measurements, generally a slightly lower ISQ value for the abutment level compared to the implant level measurement.
- 3. Determine the offset: Note the difference between the implant level and abutment level measurements. This difference, or offset, will remain constant throughout the healing period. If you are working in OsstellConnect, the software will create a graph containing the offset for you.
- 4. Follow-up measurements: During subsequent follow-up measurements, use the offset to calculate the implant ISQ. If using OsstellConnect, the software will assist in maintaining consistency and accuracy in monitoring stability over time.
Example of measurement graph
If you are using OsstellConnect, the measurement graph over time may look like this: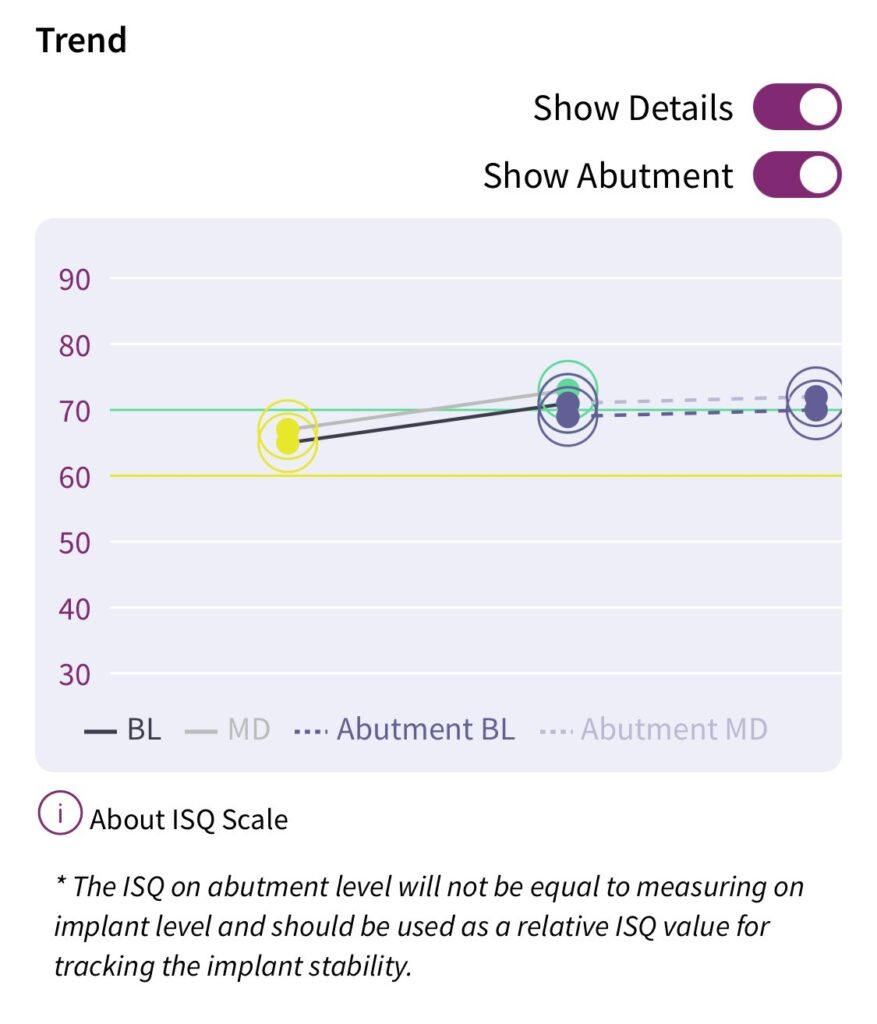
Conclusion
Measuring dental implant stability at the abutment level is a valuable practice that can enhance the predictability and success of implant treatments. By following the outlined procedure, you can obtain accurate ISQ measurements, monitor the healing process effectively, and make informed clinical decisions.
References
For more information on this topic, read our related blog post: Why measuring Osstell ISQ at the abutment level can help you achieve predictable outcomes. This post provides additional insights into the advantages of measuring stability at the abutment level, such as optimizing full arch treatments and supporting immediate loading decisions.


Add comment