지원

Osstell Beacon

여기에서 설정, 사용 및 관리는 물론 지원 자료 및 질문에 대한 답변을 포함하여 기기에 대해 필요한 모든 정보를 찾을 수 있습니다.

지원 자료

User manual

How to measure

How to register

How to connect to OsstellConnect

Trouble shoot – no reading

1단계

Osstell Beacon 충전하기

새 기기는 사용 전에 3시간 동안 충전해야 합니다.

2단계

OsstellConnect에 Beacon을 등록하고 보상 받기 등록하고 보상 받기

OsstellConnect에 Beacon을 등록하고 SmartPeg 두 상자를 무료로 받으십시오(재고 소진 시까지 신규 기기에 제공됨).

3단계

측정 시작하기

OsstellConnect의 도움말 섹션에 있는 단계별 가이드를 따르거나 당사에 문의하여 지원을 받으십시오.

기기 설정 – 단계별

이 짧은 비디오에서 Osstell Beacon을 설정하고 등록하는 방법을 단계별로 소개합니다. 5분 동안 시작해서 SmartPeg 2상자를 무료로 받으세요.

여기에서 등록하기

Osstell Beacon으로 임플란트 안정성 측정

Osstell Beacon은 몇 초 만에 임플란트 안정성을 판정합니다. 이 비디오에서는 측정 방법을 보여줍니다. 더 많은 단계별 가이드를 보려면 OsstellConnect 계정의 도움말 섹션을 방문하세요.

OsstellConnect로 이동하기
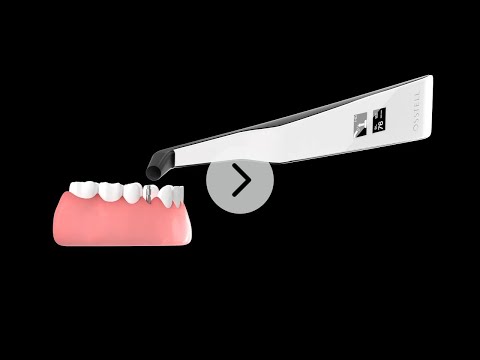
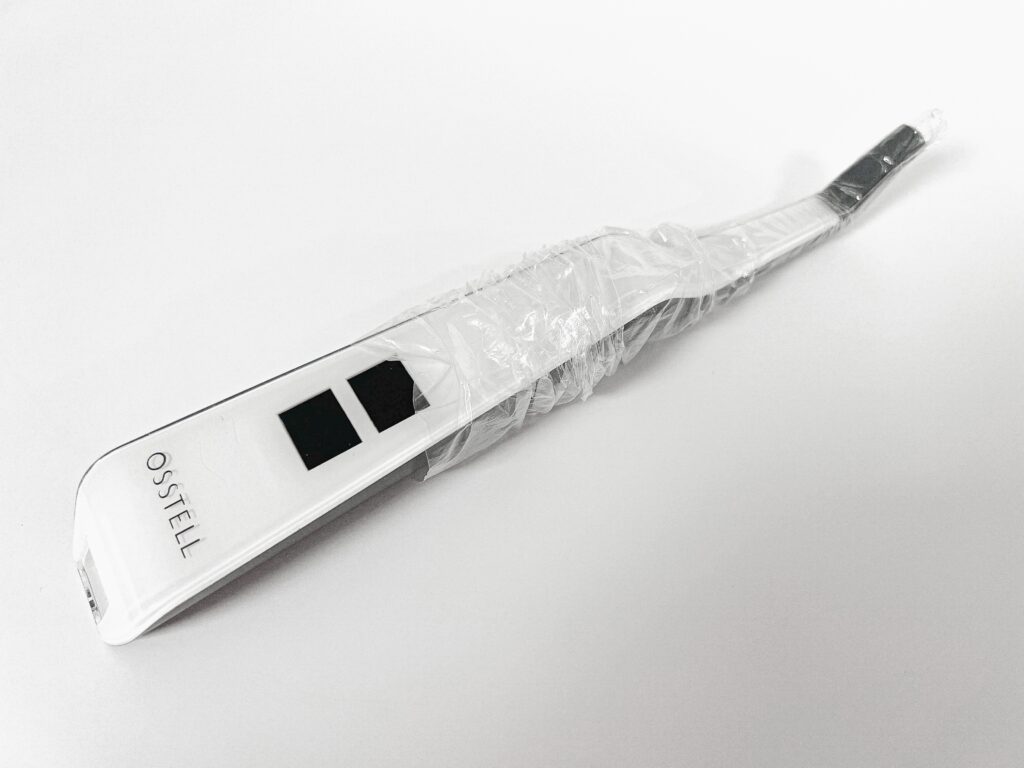
차단 슬리브

환자에게 사용하기 전에 Osstell Beacon 위에 차단 슬리브를 놓습니다. 차단 슬리브는 교차 오염을 방지하고 치과용 복합 재료가 기구 팁과 본체의 표면에 달라붙는 것을 방지하며 세척액으로 인한 변색 및 열화를 방지하는 데 도움이 됩니다.

권장 차단 슬리브:

Omnia: Non sterile cover, Art No 30.Z0600.00, Sterile cover Art No 22.Z0600.00

PremiumPlus: 123, Small short 123, Small.

주문하려면 여기를 클릭하세요.

TIDIshield, Art no: 21021, Art no: 20987.

주문하려면 여기를 클릭하세요.

Barrier sleeve

Osstell ISQ 스케일

ISQ(임플란트 안정성 지수)는 1에서 99까지의 스케일로 임플란트의 안정성을 측정합니다. ISQ 스케일은 미세 이동성에 대해 비선형 상관 관계가 있습니다. 1,500건 이상의 과학 참고 문헌에 따르면 높은 안정성은 70 ISQ이상, 60~69 사이 값은 중간 안정성, 60 ISQ 이하는 낮은 안정성을 의미한다는 것을 알고 있습니다.

ISQ 스케일
The ISQ Scale

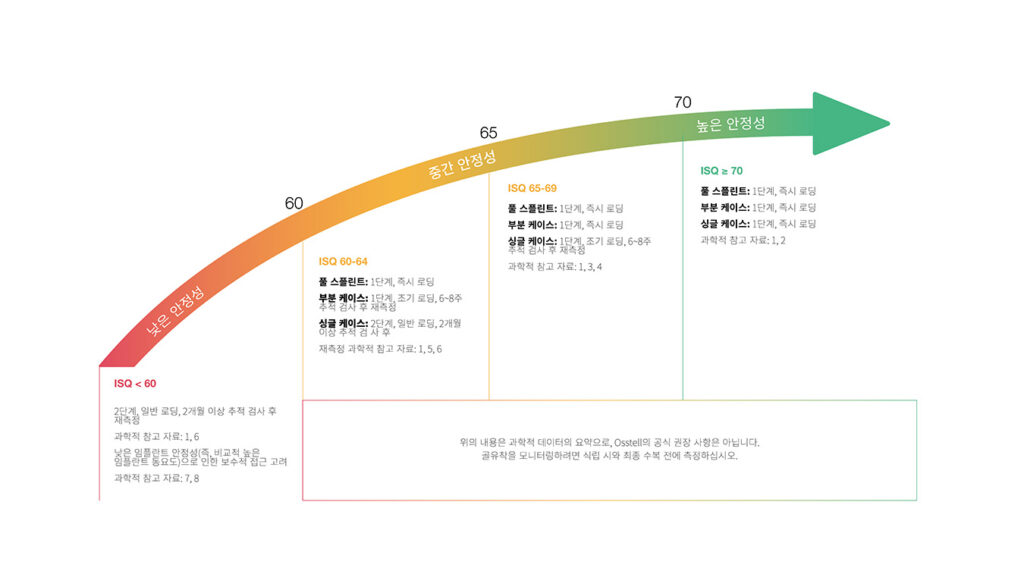
Frequently asked questions

Do I need to be connected to WiFi?

You can have your Osstell Beacon online connected to OsstellConnect for data collection, but it is not a requirement. OsstellConnect is an online tool for statistical analysis and valuable insights based on your data. Before you can start using data connection to OsstellConnect you have to register your Osstell Beacon. The serial number can be found on the back of the instrument. For registration assistance and features of data connection to OsstellConnect, please visit osstellconnect.com/beacon

How do I clean the Osstell Beacon?

Before each use, moisten a gauze or soft cloth with an acceptable (see list below) surface disinfectant and wipe the whole Osstell Beacon instrument. Note! Do not autoclave the Osstell Beacon instrument. Routinely check the surface of the instrument tip and overall surface for possible cracks and resins.

Acceptable Cleaners:
o Isopropyl alcohol
o Ethyl alcohol-based cleaners

Do not use:
o Strong alkali detergent of any type, including hand soaps and dish soaps Bleach based cleaners
o Hydrogen Peroxide based cleaners Abrasive Cleansers
o Acetone of hydrocarbon based cleaners MEK (Methyl Ethyl Ketone)
o Birex Gluteraldehyde
o Quaternary Ammonium Chloride salt-based cleaners

How do I engage / disengage transportation mode?

The Osstell Beacon is delivered from factory in a “transport” mode, where the built-in motion sensor is deactivated. To deactivate the transport mode and start charging, connect the small USB connector of the Osstell USB cable to wide end of the instrument. Connect the large USB connector to a standard USB outlet of a PC, laptop or charger.

How do I get started?

Although it is possible to use the Osstell Beacon directly, depending on the status of the built-in rechargeable battery, it is recommended to charge the battery for at least 3 hours before using the Osstell Beacon instrument.

The Osstell Beacon is activated by a built-in motion sensor. As soon as the motion sensor detects movement, the Osstell Beacon will start-up and shortly show battery status and then be ready for measurement in the BL (Buccal – Lingual) direction, which is indicated in the upper display.

The Osstell Beacon will start to measure, indicated by an audible sound, when near an Osstell SmartPeg or Test peg due to a built-in magnetic detector that senses the magnet on the top of the Osstell SmartPeg/TestPeg. Measured data will be shown in the upper display combined with a colored light indication below the tip.

The red, yellow and green color indicates if the measured ISQ value corresponds to a low, medium or high implant stability according to the ISQ scale guidance, click here for more information.

After 60 seconds of no motion, the Osstell Beacon will turn off automatically.

How do I measure with the Osstell Beacon?

1. Activate the Osstell Beacon by picking it up. The instrument will start-up and after showing the battery status, the instrument will be ready for measurement in the BL (Buccal – Lingual) direction, which is prompted in the upper display as well as optimal angle towards the Smartpeg.

2. Place a barrier sleeve over the Osstell beacon instrument.

3. Place the SmartPeg into the SmartPeg Mount. The SmartPeg is magnetic, and the SmartPeg Mount will hold the SmartPeg. See fig 2. Attach the SmartPeg to the implant or abutment by screwing the SmartPeg Mount using finger force of approximately 4-6 Ncm. Do not over-tighten, to avoid damaging the SmartPeg threads.

4. Hold the instrument tip close (2-4mm) to the top of the SmartPeg without touching it. Sometimes, you will need to go as close as 1 mm. An audible sound indicates when measurement has started, and measured data will be shown in the upper display combined with a colored light indication below the tip.

5. Bring the instrument out of the mouth to clearly read the ISQ value and the colored indication. The measured ISQ values will be displayed in the upper display for a couple of seconds and then switch to be ready for measurement in mesial-distal direction.

6. Repeat step 4 and the sequence starts over and the Osstell Beacon is ready for measurement in the BL (Buccal- Lingual) direction again.

7. When all measurements are performed, remove the SmartPeg by using the SmartPeg Mount. The instrument is automatically turned off after 60 seconds of inactivity.

What is the warranty on the Osstell Beacon?

2 years

When the Beacon doesn’t start or when the display is showing a wrench and a manual.

Charge the Beacon for at least 30 min in room temperature, then try again. If the error remains, try resetting the device by:

1. Identify the Beacon reset pin on the picture below.

Osstell Beacon Reset

2. With a paper clip, do a gentle press for 1 second on the reset button (Note! You may have to tilt the pin a little downwards).
If you see a “PadLock” symbol in the upper display, press one more time on the reset button.

Osstell Beacon Reset Lock

If the Beacon still doesn’t start or the display is showing a wrench and a manual, then please contact your local sales representative or distributor or support@osstell.com.

Why is it that I get unexpected values or no readings when measuring?

Possible explanations include:

Re-Used SmartPeg: The SmartPegs are disposable and should only be used for one or multiple measurement at one treatment session, for a single patient only. Repeated re-use may result in false readings due to wear and tear of the soft aluminum SmartPeg threads.

Wrong SmartPeg type selected for the implant: See SmartPeg reference list, osstell.com/smartpegguide

Bone or soft tissue in between SmartPeg and Implant: Make sure to clean the Implant prosthetic connection before attaching the SmartPeg.

Electromagnetic interference: Remove the source of electromagnetic interference.

Probe is held too far away from the SmartPeg: Hold the probe 2-4 mm away from the SmartPeg.

도움이 필요하신가요?

양식을 작성해 주시면 곧 연락드리겠습니다. 곧 연락드리겠습니다!